Rebuilding a Wheel
I'd brought my hub-broken rear wheel home with me last year, with the thought of rebuilding the wheel and getting it back on my Surly LHT, the bike I'll use for this trip. It took me a while to find an acceptable replacement hub, which turned out to be a Wheel Master MT-5000.

| Heart | 1 | Comment | 0 | Link |
The new hub looked good when I had it in my hands, except the spoke holes were bigger than the wheel's original Shimano Deore XT M760.

| Heart | 0 | Comment | 0 | Link |
Maybe hub spoke hole diameter doesn't matter that much, but it had me looking for different spokes with larger heads. What I came up with was Sapim single-butted 13/14G spokes. I read articles, watched videos, then started my wheel rebuild. I used the bike frame as a truing stand and kept tightening the drive-side spokes to get the proper dish. When I got done, the spokes seemed really tight. I went back on-line to read more about spoke tension, and decided I needed to buy a tension gauge to see where I was.

| Heart | 1 | Comment | 0 | Link |
Well, my spokes were tensioned off-the-chart high!
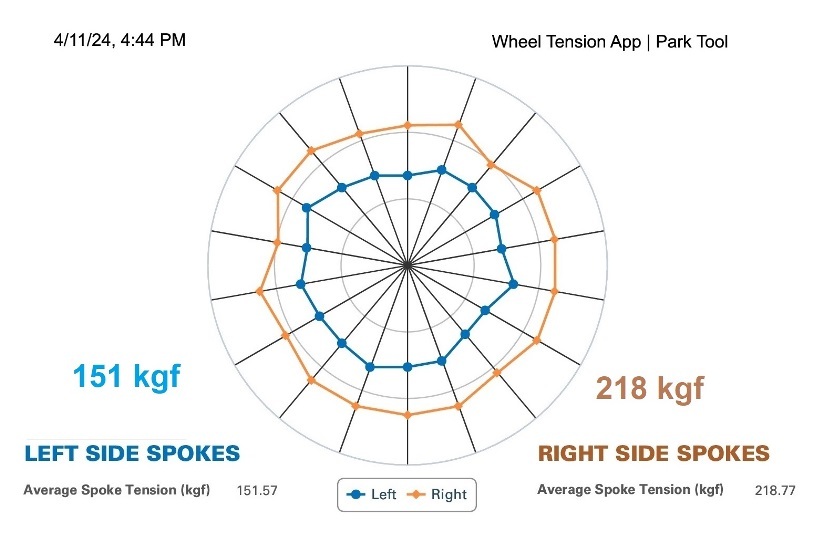
I could not find a maximum or recommended spoke tension specification for the Alex Adventurer rims I have, but the Tension Meter Conversion Table had a 53 to 173 kgf range for the spokes I'm using. I decided to have 120 kgf be my upper limit. Being I was initially so over-tight, I might have stressed the rim holes. So as an extra precaution, I switched rims – front to back.


| Heart | 3 | Comment | 2 | Link |
Great job and may you have many trouble-free miles on your new wheel. I can spend hours trying to get the graph of the tension to look like a smooth circle (while still keeping the wheel true and properly dished), but it sure is satisfying when you nail it!
Kerry
11 months ago
Thanks! It was a project. I did have that satisfying feeling when it was done :)
Jeff
11 months ago
Next, I needed to replace the headset. By the time I'd arrived home last year, the steering was "indexed" – had detents you could feel that wanted to keep the front wheel pointing straight or turned at angled positions which were evenly spaced apart. Starting last year's trip with the headset adjusted too tight is probably the reason it wore out. Replacement was an involved but successful project.
Other changes were replacing the worn rear derailleur guide pulley, switching the small chainring from 26T to 24T (to help going up hills), and installing a new chain. I then checked the old chain. It had stretched 0.27% over last year's 4450 miles. I believe 0.5% stretch is the recommended 'replace chain' point, so it wasn't completely worn out.

Having read so many recommendations, and finding a deal on ebay, I purchased a set of Schwalbe Marathon tires (700x35C, 37-622) and two Schwalbe Air Plus tubes. Maybe I won't need to carry a spare tire along this year.

If I can get my front replacement brake pads to quit squeaking, I'll be all set.
| Rate this entry's writing | Heart | 6 |
| Comment on this entry | Comment | 0 |